INTRODUCTION of Essential Camera Settings for Beginners: Shutter Speed, Aperture, and ISO.
When it comes to photography, understanding your camera’s settings is essential for capturing high-quality photos. As a beginner, it can be overwhelming to navigate the various buttons and knobs on your camera, but mastering the basics is the first step towards becoming a skilled photographer.

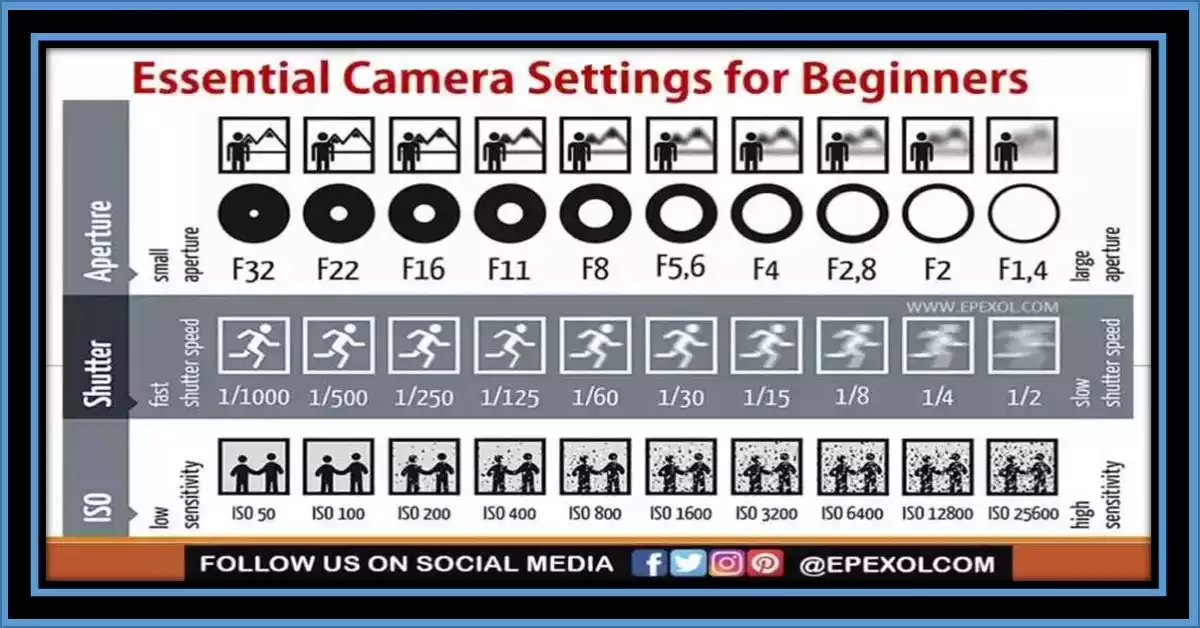
Three camera settings that you need to understand are shutter speed, aperture, and ISO. These settings play a critical role in determining the quality of your photos, and once you understand how they work, you’ll have greater control over the outcome of your images.
In this article, we’ll explore these essential camera settings in detail, providing you with tips and examples on how to use them effectively. By the end of this article, you’ll have a better understanding of shutter speed, aperture, and ISO, and be equipped with the knowledge you need to capture stunning photos.
Camera settings and their importance for taking high-quality photos.
Yes, camera settings are crucial for taking high-quality photos. Without understanding how to adjust your camera’s settings, you risk capturing poorly exposed or out-of-focus images. In addition, certain camera settings can help you create specific effects in your photos, such as motion blur or a shallow depth of field.
By mastering your camera’s settings, you’ll have greater control over the outcome of your photos and be able to express your creative vision more effectively. Furthermore, understanding camera settings can also help you troubleshoot issues with your photos, such as when they’re too dark or too bright.
Overall, understanding camera settings is an essential skill for any photographer who wants to capture high-quality photos.
How shutter speed, aperture, and ISO are three essential camera settings that beginners need to understand.
Shutter speed, aperture, and ISO are three essential camera settings that beginners need to understand because they play a critical role in determining the exposure and focus of your photos. Shutter speed refers to the amount of time your camera’s shutter is open when taking a photo.
It affects how motion is captured in your photos, so it’s crucial to adjust it appropriately depending on the subject matter you’re photographing. Aperture, on the other hand, refers to the size of the opening in your camera’s lens. It affects how much light enters the camera and the depth of field in your photos.
Understanding the aperture is crucial for controlling the amount of background blur or sharpness in your photos. Lastly, ISO refers to the sensitivity of your camera’s image sensor. It affects the amount of noise or graininess in your photos and is especially important when shooting in low-light conditions.
By understanding how these three camera settings work together, you’ll be able to create well-exposed and properly focused photos in a variety of shooting scenarios.
Shutter speed and explain how it affects exposure and motion blur.
Shutter speed is a camera setting that determines how long the camera’s shutter remains open when taking a photo.
It is measured in fractions of a second, such as 1/500 or 1/30. Shutter speed plays a crucial role in determining the exposure of your photo and the amount of motion blur that is captured.
Exposure refers to how much light reaches the camera’s sensor when taking a photo. A fast shutter speed (such as 1/500 or 1/1000) lets in less light and results in a darker photo, while a slower shutter speed (such as 1/30 or 1/15) lets in more light and results in a brighter photo.
Adjusting shutter speed can help you create well-exposed photos in a variety of lighting conditions. Motion blur refers to the amount of blur that is captured in a photo due to motion.
A fast shutter speed (such as 1/500 or faster) freezes motion and results in a sharp photo, while a slower shutter speed (such as 1/30 or slower) captures motion blur and results in a softer, blurred photo. The amount of motion blur that is captured depends on the speed and direction of the moving subject, as well as the shutter speed that is used.
Understanding shutter speed is crucial for capturing sharp and well-exposed photos, especially when shooting moving subjects. By adjusting shutter speed appropriately, you can freeze or blur motion to create a specific effect in your photos.

Tips on how to adjust the shutter speed for different shooting scenarios.
- Fast shutter speed for action photography. When photographing fast-moving subjects, such as sports or wildlife, you’ll want to use a fast shutter speed to freeze the action. Start with a shutter speed of 1/500 or faster, and adjust as needed to capture sharp, well-exposed photos.
- Slow shutter speed for creative motion blur. If you want to capture intentional motion blur, such as in a waterfall or moving traffic, you’ll want to use a slow shutter speed. Start with a shutter speed of around 1/15 or slower, and experiment to find the right speed to capture the amount of blur you desire.
- Shutter priority mode for quick adjustments. Many cameras have a shutter priority mode, which allows you to set the shutter speed while the camera adjusts the aperture and ISO automatically for proper exposure. This mode is useful when you need to quickly adjust the shutter speed for changing shooting conditions.
- Use a tripod for slow shutter speeds. When using a slow shutter speed, it’s important to keep the camera stable to avoid camera shake. Use a tripod or other stable surface to keep the camera steady and avoid blur from camera movement.
- Consider image stabilization. Some cameras and lenses have built-in image stabilization, which can help reduce camera shake when using slower shutter speeds. If your camera has this feature, consider turning it on for sharper photos.
Remember, adjusting shutter speed is just one of the many camera settings that can affect the outcome of your photos. Don’t be afraid to experiment and try new things to capture unique and creative images.
Definition of aperture and explain how it affects depth of field and exposure.

Aperture is another essential camera setting that determines how much light enters the camera’s lens when taking a photo. It is measured in f-stops, such as f/2.8 or f/11. Aperture plays a crucial role in determining the exposure of your photo and the depth of field that is captured.
Exposure refers to how much light reaches the camera’s sensor when taking a photo. A wider aperture (such as f/2.8) lets in more light and results in a brighter photo, while a narrower aperture (such as f/11) lets in less light and results in a darker photo.
Adjusting the aperture can help you create well-exposed photos in a variety of lighting conditions. Depth of field refers to the range of distance in a photo that appears sharp and in focus.
A wider aperture (such as f/2.8) results in a shallow depth of field, with only a small area of the photo appearing in focus, while a narrower aperture (such as f/11) results in a deeper depth of field, with more of the photo appearing in focus.
The depth of field that is captured depends on the aperture that is used, as well as the distance between the camera and the subject.
Understanding aperture is crucial for controlling the amount of light that enters the camera’s lens, as well as the depth of field that is captured in your photos.
Tips on how to adjust the aperture for different shooting scenarios.
- Wide aperture for portraits. A wide aperture (such as f/2.8 or lower) is great for portrait photography because it allows you to isolate the subject from the background with a shallow depth of field, creating a blurry background that makes the subject stand out. Just make sure the subject’s eyes are in focus.
- Narrow aperture for landscapes. A narrow aperture (such as f/11 or higher) is great for landscape photography because it allows you to capture more of the scene in focus, from the foreground to the background.
- Aperture priority mode for quick adjustments. Like shutter priority mode, many cameras have an aperture priority mode that allows you to set the aperture while the camera adjusts the shutter speed and ISO automatically for proper exposure.
- Be mindful of diffraction. When you use a very narrow aperture (such as f/22), you may experience a loss of sharpness due to diffraction. To avoid this, try to keep your aperture between f/8 and f/16 for the sharpest possible images.
- Use a fast lens for low-light situations. A lens with a wide maximum aperture (such as f/1.8 or f/1.4) is great for low-light situations because it allows you to capture more light and use faster shutter speeds to avoid blur.
Remember, adjusting the aperture is just one of the many camera settings that can affect the outcome of your photos. Don’t be afraid to experiment and try new things to capture unique and creative images.
Definition of ISO and explain how it affects image quality and noise.

ISO refers to how sensitive your camera sensor is to light. The higher the ISO, the more sensitive the sensor is to light, and the brighter your photo will be. However, increasing ISO can also introduce digital noise or graininess to your image, which can degrade the overall image quality.
In well-lit situations, a lower ISO (such as 100 or 200) is generally preferred to achieve the best image quality, while in low-light situations, a higher ISO (such as 800 or higher) can be used to increase the brightness of the image.
However, using too high an ISO can result in a noisy or grainy image, so it’s important to find a balance between the ISO setting and the amount of available light.
It’s worth noting that different cameras can handle noise at higher ISO settings differently, so it’s a good idea to experiment with your camera to see how it performs at different ISO settings.
Additionally, some cameras have built-in noise reduction features that can help to reduce noise at higher ISO settings, but this can sometimes result in a loss of detail.
In general, a lower ISO is preferable for achieving the best possible image quality, but it’s important to understand how to adjust ISO to compensate for different lighting situations and still achieve the desired outcome.
Tips on how to adjust ISO for different shooting scenarios.
- Use a low ISO for bright conditions. In well-lit situations, such as outdoors on a sunny day, use a low ISO (such as 100 or 200) to avoid introducing noise or graininess to your images.
- Use a high ISO for low-light conditions. In low-light situations, such as indoors or at night, use a higher ISO (such as 800 or higher) to brighten your images. Be mindful, however, that increasing ISO can also increase noise or graininess in your images.
- Use a tripod to avoid a camera shake. When shooting in low-light situations, it’s common to use a higher ISO to compensate for the lack of available light. However, using a higher ISO can also increase the chances of introducing a camera shake into your images, which can result in blurry photos. To avoid this, consider using a tripod or other stabilization method to keep your camera steady.
- Check your camera’s noise reduction settings. Some cameras have built-in noise reduction features that can help to reduce noise at higher ISO settings. Check your camera’s manual to see if it has this feature and how to enable it.
- Experiment with your camera’s ISO performance. Every camera handles noise at higher ISO settings differently, so it’s a good idea to experiment with your camera to see how it performs at different ISO settings. Take some test shots at different ISO settings and review them on your computer to see how much noise or graininess is present.
Remember, adjusting ISO is just one of the many camera settings that can affect the outcome of your photos. Don’t be afraid to experiment and try new things to capture unique and creative images.
How shutter speed, aperture, and ISO work together to create a well-exposed and properly focused photo.
Shutter speed, aperture, and ISO are three fundamental camera settings that work together to create a well-exposed and properly focused photo.
Shutter speed controls the duration of time that the camera’s sensor is exposed to light, which can create motion blur or freeze action depending on the setting.
The aperture controls the size of the opening in the lens through which light enters the camera, affecting the depth of field and the amount of light that reaches the sensor. ISO controls the sensitivity of the camera’s sensor to light, affecting the brightness and noise level of the image.
To create a well-exposed and properly focused photo, these three settings must be balanced. For example, if you want to freeze the action of a moving subject, you may need to use a fast shutter speed to capture the moment, but that may also reduce the amount of light that reaches the sensor.
To compensate for this, you may need to open up the aperture to let more light in, or increase the ISO to make the sensor more sensitive to light.
Similarly, if you want to capture a photo with a shallow depth of field, you may need to use a wide aperture to blur the background, but that may also cause the photo to be overexposed. To balance this out, you may need to use a faster shutter speed or decrease the ISO to reduce the amount of light that reaches the sensor.
In general, the best approach is to start with one setting and adjust the others as necessary to achieve the desired exposure and focus. With practice, you will develop a better understanding of how shutter speed, aperture, and ISO work together to create a well-exposed and properly focused photo.
Tips on how to balance these settings for different lighting conditions and subject matter.
Here are some tips on how to balance shutter speed, aperture, and ISO for different lighting conditions and subject matter.
- Bright sunlight. In bright sunlight, you may need to use a fast shutter speed and a smaller aperture to avoid overexposure. To keep your ISO low, you can use a polarizing filter to reduce the amount of light that enters the camera.
- Low-light conditions. In low-light conditions, you may need to use a slower shutter speed or a wider aperture to let more light in. You can also increase the ISO to make the camera’s sensor more sensitive to light, but be aware that this can also introduce noise into your photos.
- Moving subjects. To capture moving subjects, you may need to use a faster shutter speed to freeze the action. You can also increase your ISO to compensate for the reduced amount of light, but be aware that this can also increase noise in your photos.
- Shallow depth of field. To create a shallow depth of field and blur the background, you can use a wide aperture. However, be careful not to overexpose your photo. You can balance this out by using a faster shutter speed or decreasing your ISO.
- Large depth of field. To create a large depth of field and keep everything in focus, you can use a smaller aperture. However, this may also require a slower shutter speed or higher ISO to compensate for the reduced amount of light.
Remember that the best approach is to experiment with different settings and practice to gain a better understanding of how shutter speed, aperture, and ISO work together in different situations. With time, you’ll be able to quickly adjust your camera settings to achieve the desired exposure and focus for any subject matter and lighting condition.
Conclusion:
In conclusion, understanding the essential camera settings of shutter speed, aperture, and ISO is crucial for beginners who want to take high-quality photos. By mastering these settings, you can have more control over the exposure, focus, and depth of field of your photos, allowing you to capture the scene exactly as you envision it.
To summarize, shutter speed controls the duration of the exposure and the amount of motion blur in your photo, while aperture controls the amount of light that enters the camera and the depth of field of your photo. ISO, on the other hand, controls the camera’s sensitivity to light and can affect image quality and noise.
By adjusting these settings for different shooting scenarios and lighting conditions, you can create well-exposed and properly focused photos. With practice and experimentation, you’ll be able to master these settings and capture stunning photos that truly showcase your creativity and vision.


